RecSys
A Recommender System by DataChef
Table of Content
Overview
DataChef’s RecSys is a fully automated end-to-end recommender system based on recent deep learning techniques. RecSys is highly flexible to your business needs, and it is fully compatible with your other AWS solutions. RecSys automatically provisions the required resources and implements the entire pipeline of the recommender system within your AWS account with just a few clicks. RecSys is a general-purpose recommender system that can be applied to various industrial domains and supports various types of interactions and entities. RecSys consists of a hybrid of collaborative filtering and content-based machine learning models to better recommending the entities to the end-users. In addition, RecSys implements an easy-to-use admin panel for customizing and initializing the workflow and provides a dashboard for reporting and visualizing the business KPIs.
Features
- Fully automated end-to-end recommender system
- Highly flexible to your business needs
- Fully compatible with other AWS solutions
- Easy to deploy
- Supports various types of interaction and entity data
- Provides various types of outputs such as CSV files and APIs
- Comprehensive admin panel for customizing and initializing the system’s workflow
- Dashboard for analyzing the key performance indicators (KPIs)
- Based on recent deep learning techniques and best practices
- Hybrid recommender system based on collaborative filtering and content-based models
RecSys architecture
RecSys is composed of three stacks each of which corresponds to a certain part of the system’s pipeline. In addition, RecSys provides a command center admin panel to customize the configurations of the system. Moreover, RecSys offers a dashboard for reporting and visualizing the key performance indicators (KPIs) of recommendations for the business.
Collector stack
Modules within the collector stack are responsible for the data-related tasks of the pipeline. These tasks include data acquisition, data preprocessing, and feature engineering of the data. To be more precise, independent of the users’ specific business data types, RecSys implements a general data model to satisfy various data types of the businesses. In other words, whether the user owns an e-commerce business (e.g., online store), a media company (e.g., blogs, video, music, podcasts, news, …), or any other business, the RecSys data model handles the entities of the business and their interactions.
Data Model
RecSys abstracts the entities of the businesses into “user” and “item” data, where each user can have an “interaction” with each item. The “user” and “item” entities refer to the users of the business and the items (such as products, contents, etc.) that those users have interaction with, respectively. In addition, all the possible activities that can happen in the business are abstracted in the “interaction” data. These activities may refer to an implicit rating of the user to the item (such as views, clicks, purchases, likes, bookmarks, etc.) or an explicit rating (such as scores that users associate with the items).
RecSys expect the end-user of the system to provide the following data files:
user_item_interactions.csv
This CSV file contains all the user-item interactions of the business. It has the following columns:
- interaction_id (required): The ID of the interaction.
- user_id (required): The ID of the user who has had an interaction with an item.
- item_id (required): The ID of the item which the user has interacted with.
- rating (required): The interaction value. In the case of implicit ratings, all interactions have the value 1. In the case of explicit ratings, the value of the rating is the number encoding the score that the user has assigned to the item.
- timestamp (optional): The timestamp of the interaction. This column is optional but it is recommended to add it to your data in order to use the dashboard analyses. The required timestamp format is the Unix epoch time, i.e., the number of seconds passed since January 1, 1970, 00:00:00 (UTC).
- source (optional): The source of the interaction. Its value can either be “recsys” or any other arbitrary value. The source indicates the root of the interaction. If the item that the user has interacted with has been provided by the recommender system, the value must be “recsys”. Otherwise, the value can be arbitrary (such as “homepage” indicating the item was provided on the homepage by the application logic). This column is optional but it is recommended to add it to your data in order to use the dashboard analyses.
Here is an example of such CSV file
5934cb55-fbbf-41f0-8923-dcc7bc6fa03a,2578,472,1,recsys,97830076
e2971648-45fa-4913-b5e6-88633cc12da4,54,189,1,search,97830196
2bc08c35-4b81-4631-9a82-70e71287a76d,4425,822,1,recsys,97830228
b8f82a63-b901-4d89-ad90-1597f51eeb29,3131,799,1,homepage,97830218
2a3c13f4-fcf9-43d6-8407-2a2da3ab3cc0,2176,2112,1,search,97830220
ce85dd47-49a2-48ad-9b40-b3a9180021f0,4318,2507,1,recsys,97882426
dd7c28da-fc31-448c-8054-fe97f04a44db,2312,3126,1,homepage,97830220
Where the columns are interaction_id, user_id, item_id, rating, source and timestamp.
item_features.csv
This CSV file contains all the items within the item catalog of the business. It has the following required column.
- item_id (required) The ID of the item.
In addition to the “item_id”, item_features.csv can contain any number of arbitrary additional features. These features can have four different types, namely
- “int”: any integer number.
- “double”: any real number.
- “string”: any categorical value.
- “set”: variable-length list of “string” values.
Here is an example of such CSV file
472,Toy Story,26,"['Animation', ""Children's"", 'Comedy']"
189,Jumanji,26,"['Adventure', ""Children's"", 'Fantasy']"
822,Grumpier Old Men,26,"['Comedy', 'Romance']"
799,Waiting to Exhale,26,"['Comedy', 'Drama']"
2112,Father of the Bride Part II,26,['Comedy']
2507,Heat,26,"['Action', 'Crime', 'Thriller']"
3126,Sabrina,26,"['Comedy', 'Romance']"
where the first column is the item_id, and the second, third and fourth columns have the types “string”, “int” and “set”, respectively. The description of the item features must be provided in the item_features_description.json file.
item_features_description.json
This JSON file contains the description of the item_features.csv file features. RecSys supports four different data types, namely “int”, “double” which are numerical features, “string” which is a categorical feature, and “set” which is a variable-length list of categorical features. The structure of the JSON file is as follows:
Keys are the number of the columns in the item_features.csv file (starting from 0). Values are dictionaries with predefined keys “name” and “type”. Value of the “name” key is an arbitrary name of the feature and the value of the “type” key can be one of the types “int”, “double”, “string”, and “set”.
Here is an example of such JSON file corresponding to the item_features.csv example.
{
  "0": {
    "name": "item_id",
    "type": "ID"
  },
  "1": {
    "name": "name",
    "type": "string"
  },
  "2": {
    "name": "age",
    "type": "int"
  },
  "3": {
    "name": "genre",
    "type": "set"
  }
}
Core stack
The core stack contains the modules for the model training and the model selection processes. The training module loads the preprocessed data, which is produced by the collector stack, and trains a recommender model based on the given data. The training module implements a deep neural network model which is a hybrid of collaborative filtering and content-based recommender models. This allows the model to not only consider the information contained in the interactions, but also the content information of the entities. After the training is done, the trained model will be saved in its corresponding path in the S3 bucket. Then, the evaluation module evaluates the performance of the trained model on the test data. If the performance satisfies the specified threshold by the user, the trained model will be selected for the inference step. The inference step is implemented in a batch-wise manner, meaning that the model will produce an estimated probability score for the interaction between all possible pairs of users and items. The produced artifacts then will be saved in their corresponding directory within the S3 bucket, for later use of the responder stack.
Responder stack
As its name suggests, the responder stack implements the interface of the system for the end-user. Responder stack serves several APIs for recommending items-to-users, users-to-items, and most popular items. Note that it is also possible for the user to use pre-computed recommendations of the core stack directly within their applications.
Setup Guide
In this section, we present the step by step walk-through of configuring the RecSys. The expected amount of time it takes to complete the deployment is 15 minutes. Also a polite reminder on security, we follow the AWS Security best practices and strongly recommend you do to. Please don’t use your root user for any deployment or operation.
Step.1
In order to start using the RecSys, first, you need to subscribe to the product in the subscription page.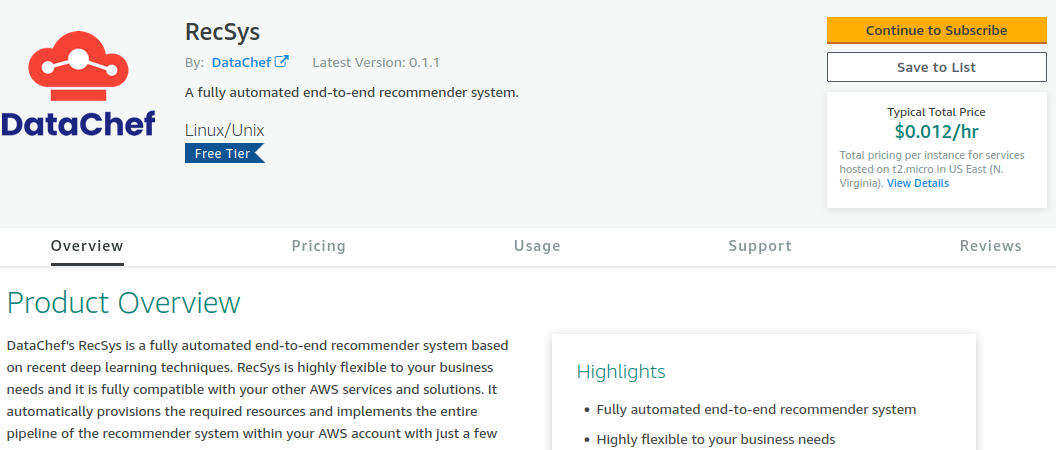
As it is shown, RecSys is free software and DataChef imposes no charges for using the product. The “Typical Total Price $0.012 /hr” refers to the use of the “t2.micro” EC2 instance recommended for the launch of the admin panel.
Once the admin panel is launched, you can configure RecSys to run the collector, core, and responder workflows. Note that AWS impose charges depending on the instances that you choose for each of these workflows, the volume of your data, and the system’s configuration.
Click on the “Continue to Subscribe” button on the top-right of the page to proceed.
Step.2
On this page, please review the terms and conditions and pricing details, and then proceed by clicking on the “Continue to Configuration” button on the top-right of the page.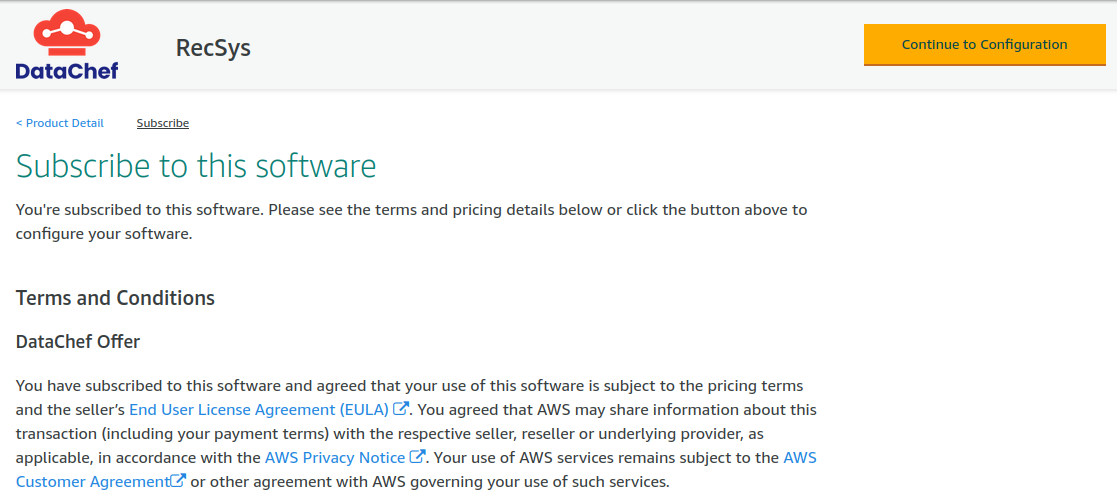
Step.3
Before you continue to launch the product, you need to make sure that the configurations are right. Please set the “Delivery Method” option to “RecSys Panel Admin” and choose the “Software Version” to be the latest available version (In this case “0.1.1 (Aug 30, 2021)”). Also, choose the “Region” of your choice from the available regions (In this case EU (Ireland)). Once you set those options, go ahead and click on the “Continue to Launch” button on the top-right of the page.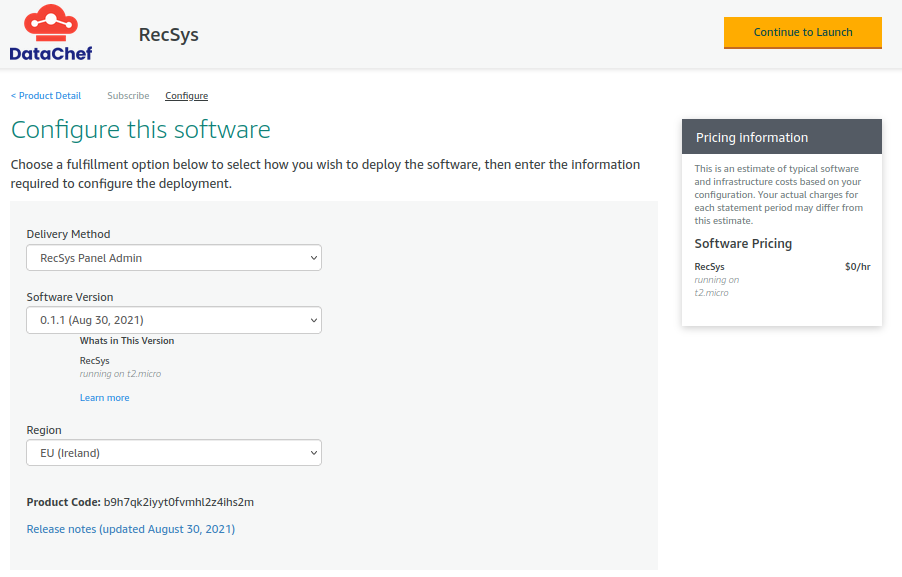
Step.4
On this page, set the “Choose Action” options to “Launch CloudFormation”. Then, click on the “Launch” button on the bottom-right of this page.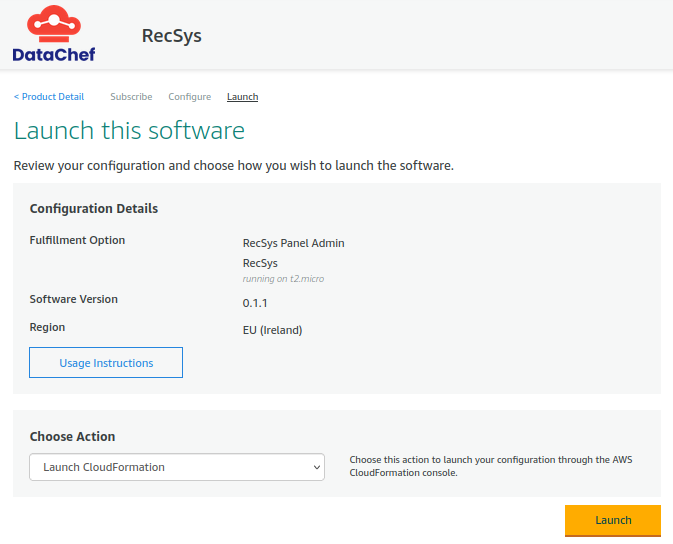
Step.5 By clicking on the launch button in the previous step (Step 4), you will be re-directed to the Stacks section of the AWS CloudFormation console where you need to configure and run the CloudFormation template of the RecSys Panel Admin.
Here, from the “Prepare template” section choose the “Template is ready” option. Also, from the “Template source” select the “Amazon S3 URL” option. Then, proceed to the next page by clicking on the “Next button” on the bottom-right of the page.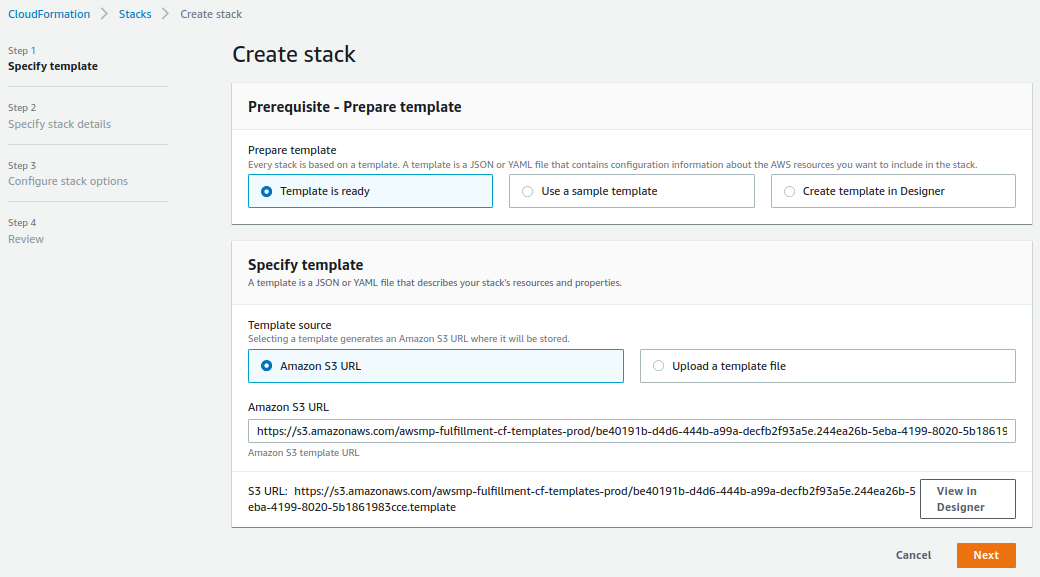
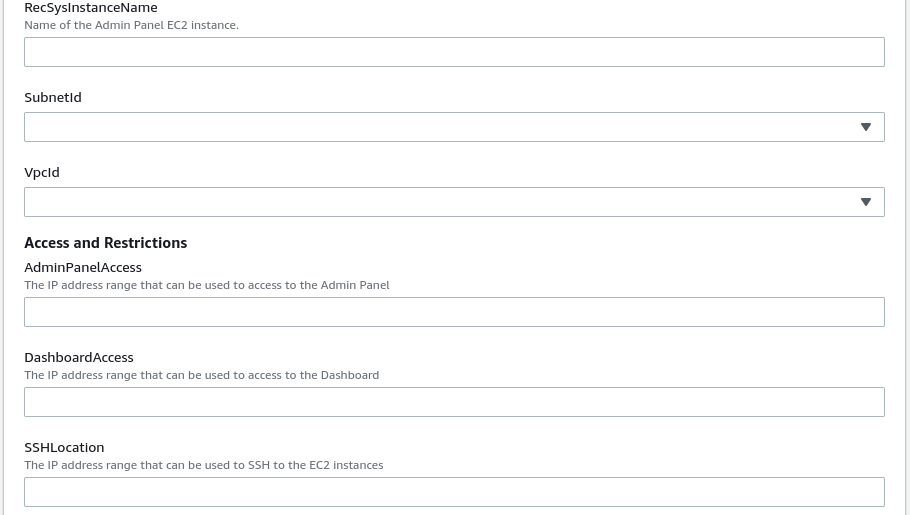
Step.6 On this page, you will specify the stack details. Please note that there are some technical configurations here that are better to be configured by the DevOps engineers of your organization.
“stack name” refers to the name of the CloudFormation stack of the RecSys panel admin and dashboard. Go ahead and set your preferred choice of name here.
“Instance type” refers to the EC2 instance type of the RecSys panel admin and dashboard which is set to “t2.micro” by default. Although the default choice has the least price, it is recommended to choose “t2.small” for better experience.
“RecSysInstanceName” refers to the name of the EC2 instance of the RecSys Panel Admin and Dashboard. Go ahead and set your preferred choice of name here.
“SubnetId” refers to the ID of the subnet in which the RecSys panel admin and dashboard will operate. It is better to be set by your organization’s DevOps engineers.
“VpcId” refers to the ID of the virtual network that is associated with the RecSys panel admin and dashboard. It is better to be set by your organization’s DevOps engineers.
“AdminPanelAccess” and “DashboardAccess” refer to the range IP addresses that have access to the RecSys admin panel and dashboard, respectively. These are better to be set by your organization’s DevOps engineers.
“SSHLocation” refers to the range of IP addresses that have access to RecSys panel admin via SSH. It is better to be set by your organization’s DevOps engineers.
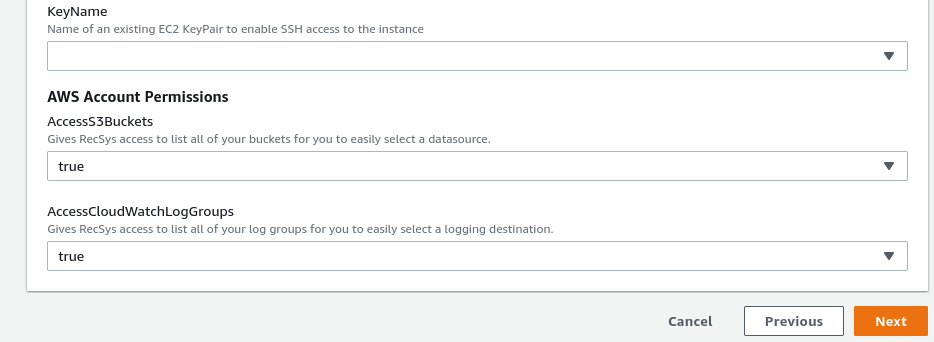
“KeyName” refers to the name of the trusted key to establish an SSH connection to the RecSys panel admin.
“AccessS3Buckets” and “AccessCloudWatchLogGroups” refer to the access of listing all S3 buckets and CloudWatch logging groups, respectively. Go ahead and set them to “true”.
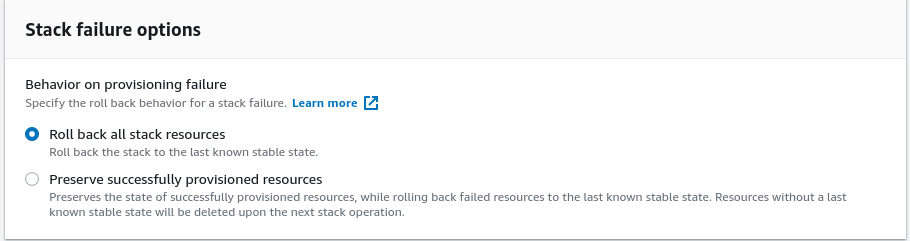
Step.7 On this page, you will configure the stack options. First, go ahead and set any required tags that you want to associate with the RecSys panel admin and dashboard. After that, in the “Permission” section, you are asked to provide an “IAM role” which is optional. This IAM role refers to the created IAM role of the ClouadFormation stack. You can let it be blank to let the corresponding role be created automatically. Next, on the “Stack failure options”, set it to “Roll back all stack resources”. This option will eliminate all other resources regarding RecSys panel admin and dashboard if anything goes wrong in the stack provisioning.
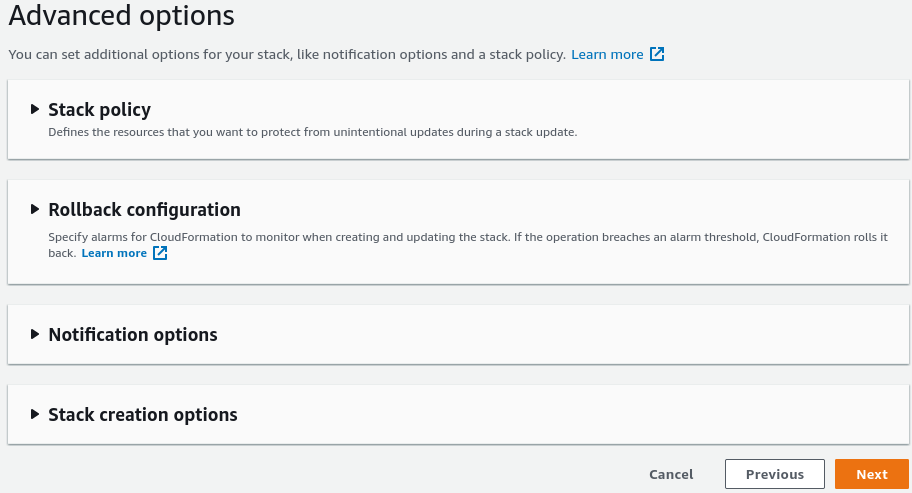
You can let the “Advanced options” section have its default configurations, otherwise, let the DevOps engineer of your organization configure this section.
After you finished configuring the stack options, proceed to the next page by clicking on the “Next” button on the bottom-right of this page.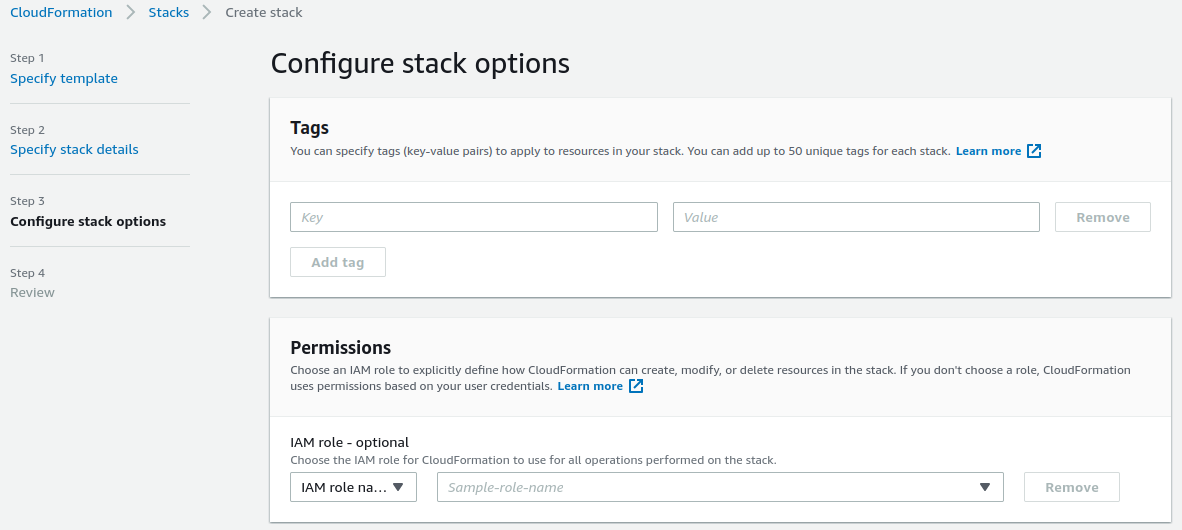
Step.8
On this page, all the configurations that you have set thus far are presented. Please review them and modify them if necessary. Notice that at the bottom of the page, you have to grant access to the stack to be able to create and manage IAM roles. This is necessary since RecSys will create roles with their corresponding access levels for various components of the system. Please go ahead and set the “I acknowledge that AWS CloudFormation might create IAM resources” check box to be true. Once you set this configuration, click on the “Create stack” on the bottom-right of the page to start the RecSys panel admin and dashboard.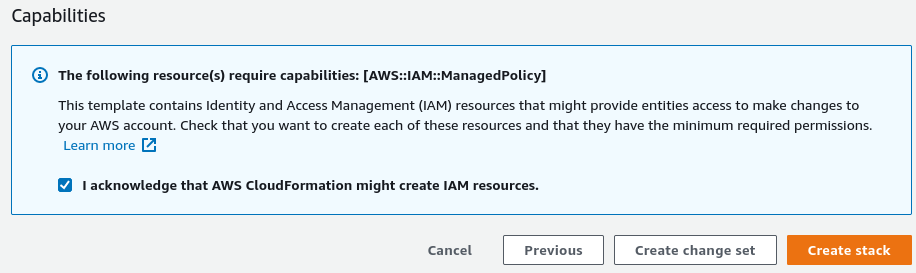
Step.9
Once you created the stack, you will be redirected to the corresponding stack section of the AWS CloudFormation console. As it is shown, the status of the stack is “CREATE_IN_PROGRESS”.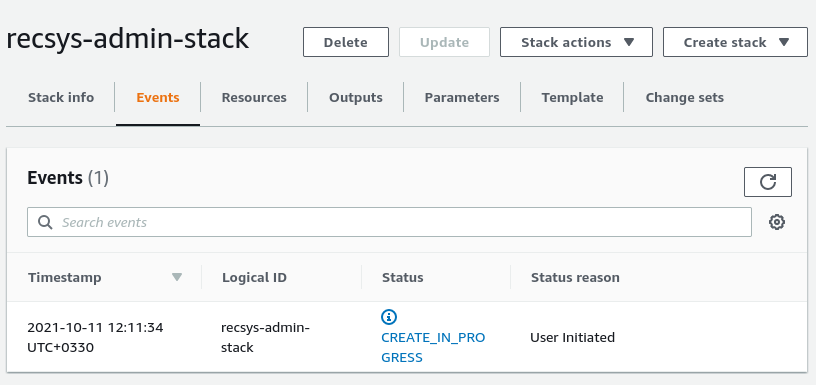
It will take several minutes for the stack to be ready. Once it is ready, the status changes to “CREATE_COMPLETE”.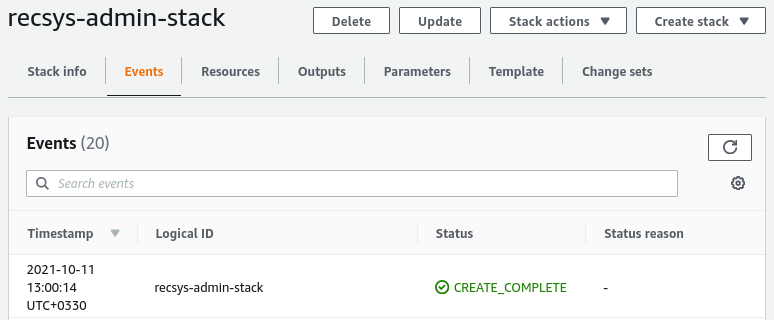
Now, the RecSys admin panel is successfully deployed. You can see its URL in the “Outputs” tab.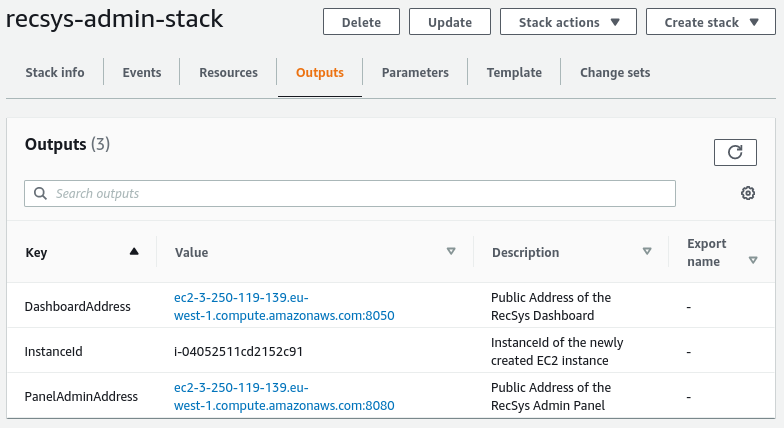
Please go ahead and click on the URL of the “PanelAdminAddress” to launch the admin panel.
Step.10
This is the home page of the RecSys admin panel. Please click on the “Begin Customization” button to start customizing the RecSys.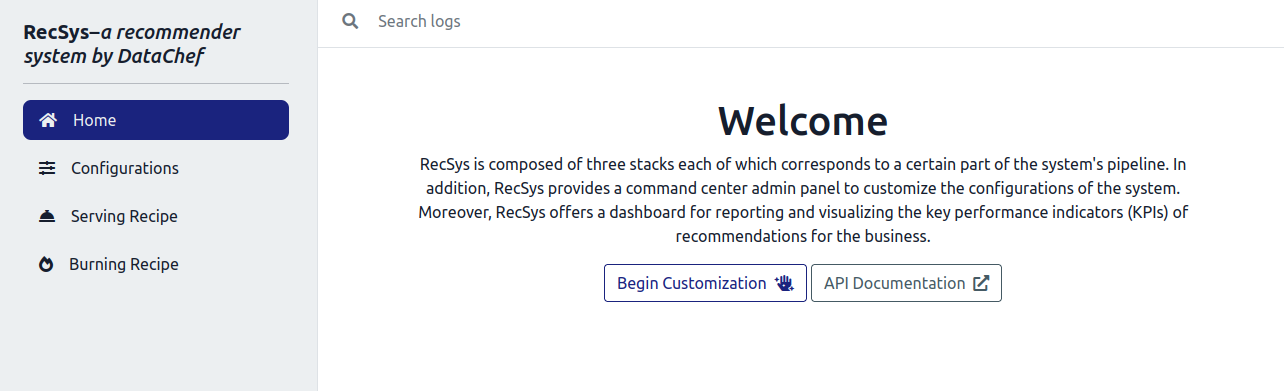
Step.11
Here, you are asked to provide an S3 bucket associated with RecSys. Note that it is recommended to create a separate S3 bucket for RecSys. Also, you are asked to provide a log group name. The log group is used to store all of the RecSys logs in a unified manner. You can create a log group in the AWS CloudWatch console.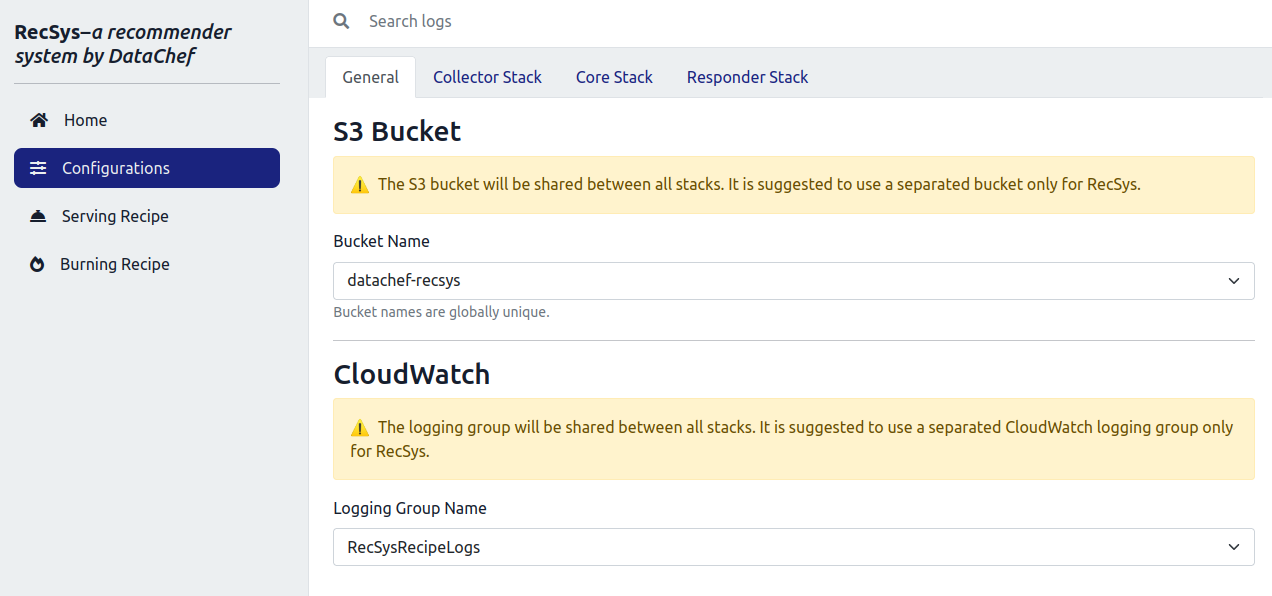
Step.12
Once you set the “Bucket Name” and the “Logging Group Name”, click on the “Collector Stack” tab to customize the instance type and instance count and its associated storage volume. These configurations determine the resources for the collector stack.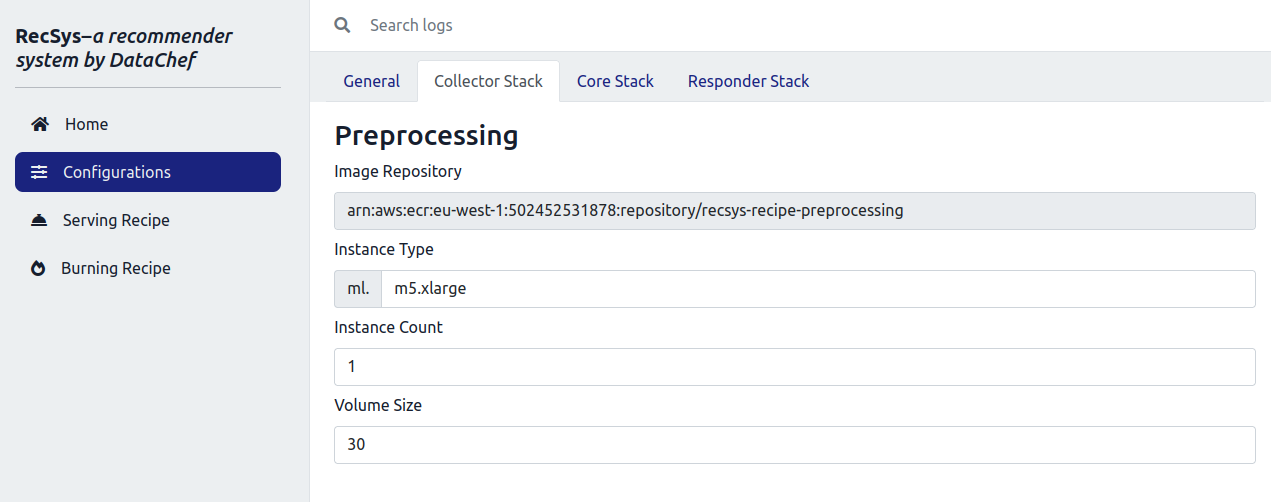
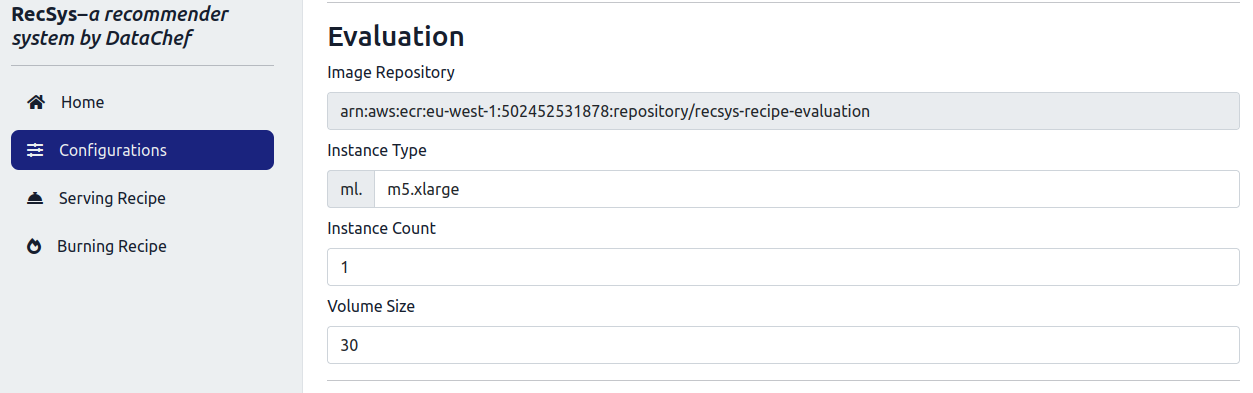
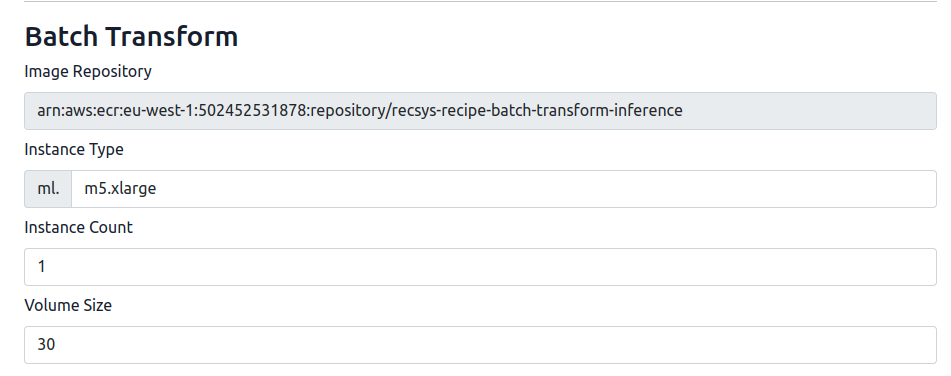
After that, click on the “Core Stack” tab and configure the instances for the “Training”, “Evaluation” and the “Batch Transform” jobs.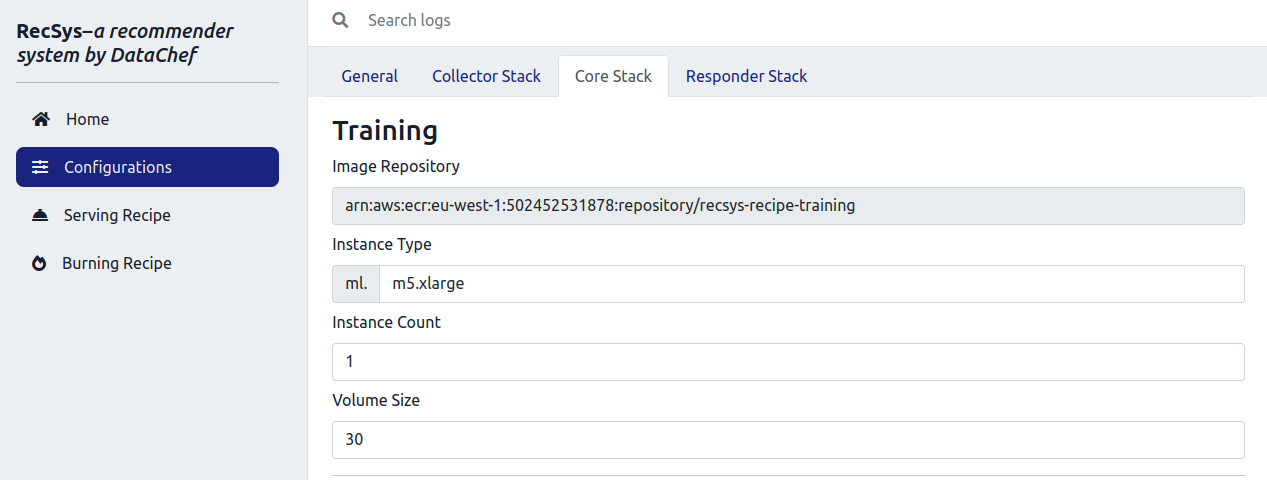
Step.13 After configuring the instances, on the left menu, click on the “Serving Recipe”. Here you can deploy each stack and execute the workflows corresponding to each of the RecSys stacks. As it was discussed in the previous section, the order in which it is necessary to run the RecSys is to first run the collector stack. The collector stack is responsible for reading your provided data sources and preprocessing the data and extracting useful features from them.
Before proceeding to deploy the collector stack, you need to upload your raw data sources into the S3 bucket that you have assigned to the RecSys. These data sources include two CSV files and one JSON file with specific names, namely, “user_item_interactions.csv”, “item_features.csv”, and “item_features_description.json”. Please go ahead and upload these files in the specified path in the associated S3 bucket:
<bucket_name>
|__ RecSys_Recipe_StepFunctions_CDK
	|__ raw_data
		|__ user_item_interactions.csv
		|__ item_features.csv
		|__ item_features_description.json
Once you uploaded your raw data sources into the recSys S3 bucket, specify a unique “Execution name”. Then, please go ahead and click on the “Deploy Configurations” button to deploy your customized collector stack.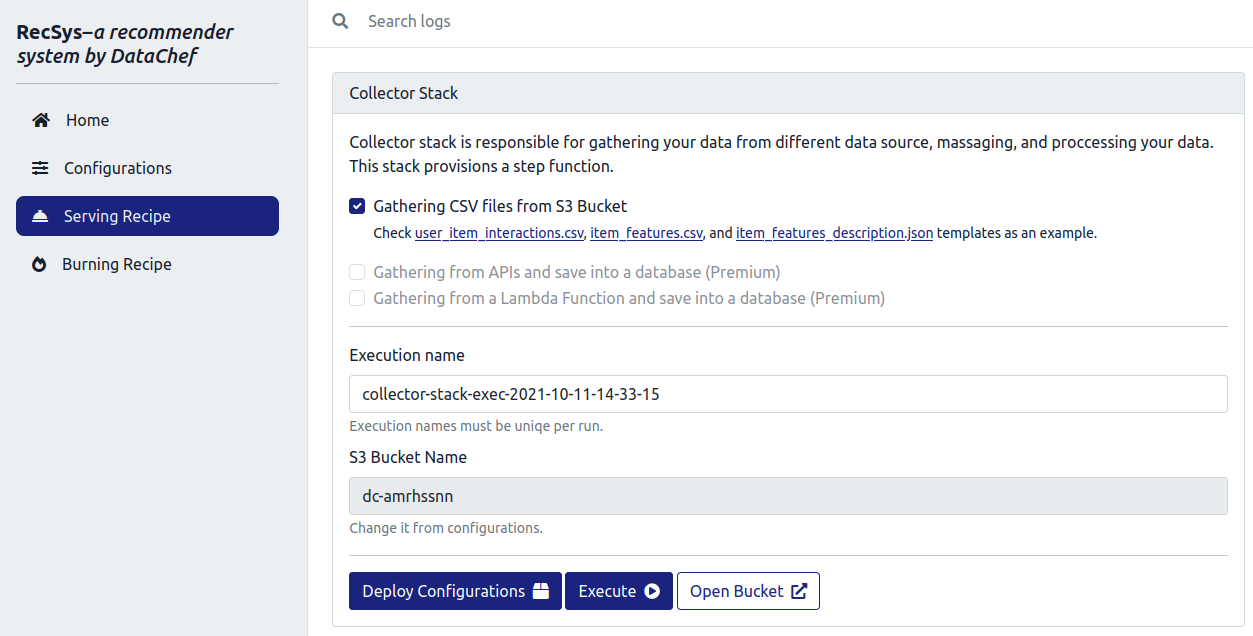
These will take about 5 minutes. After that, please click on the “Execute” button to start the collector stack’s workflows.
Step.14
After you executed the collector stack, you can open your AWS StepFunctions console to see its status.
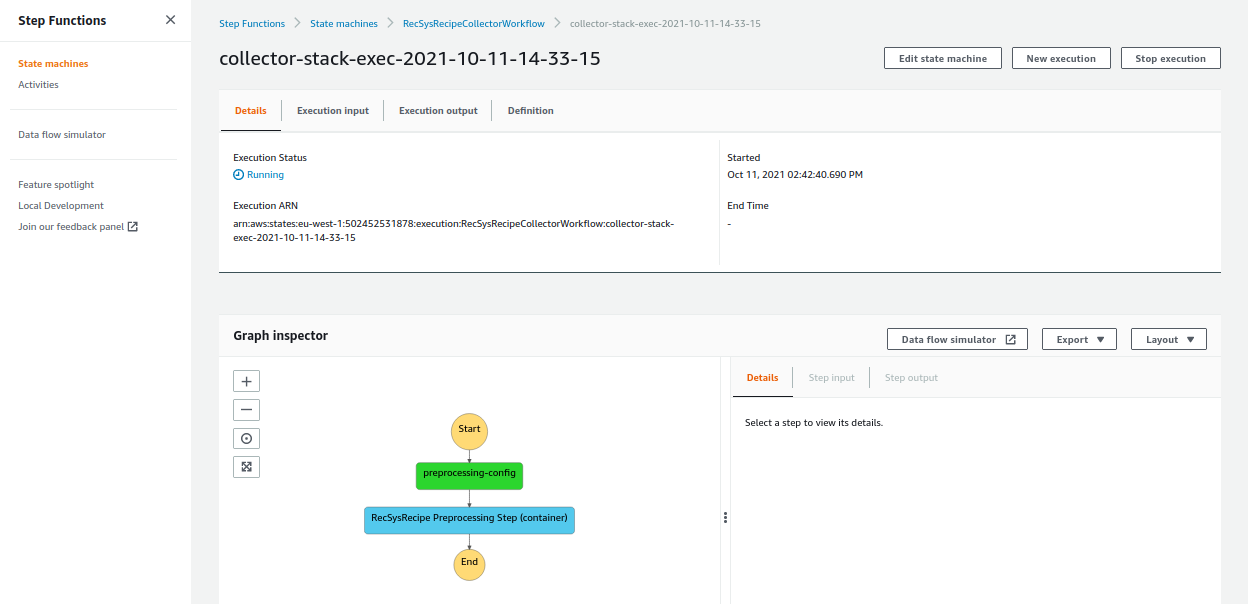
Depending on the size of your provided data, this step may take a while before the data is preprocessed completely. Please go ahead and click on the “RecSysRecipeCollectorWorkflow” to see its status in more detail.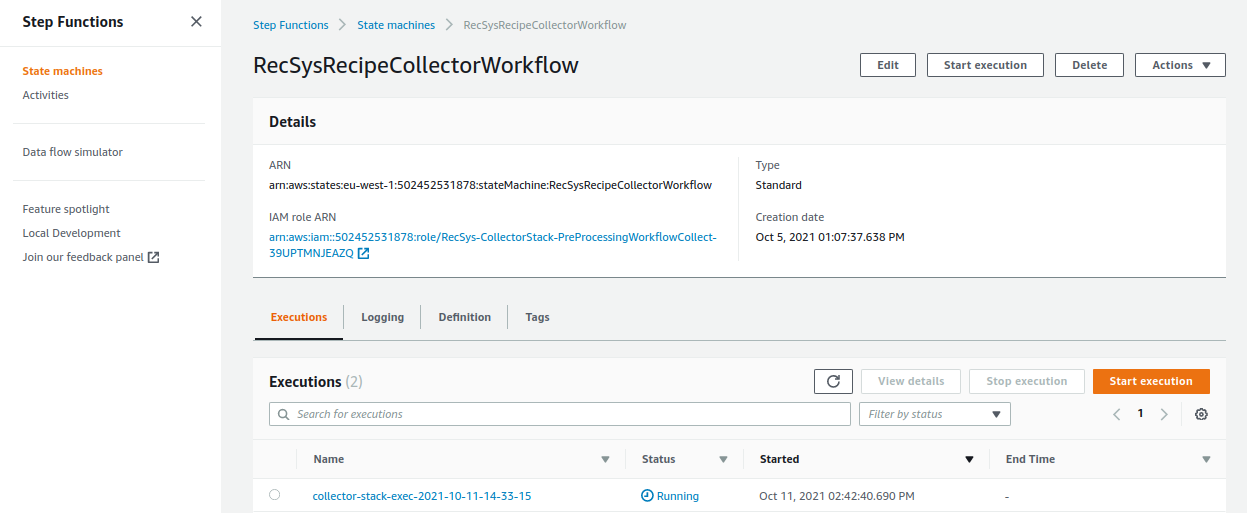
Once the workflow is executed successfully, the color of all the steps is changed to green.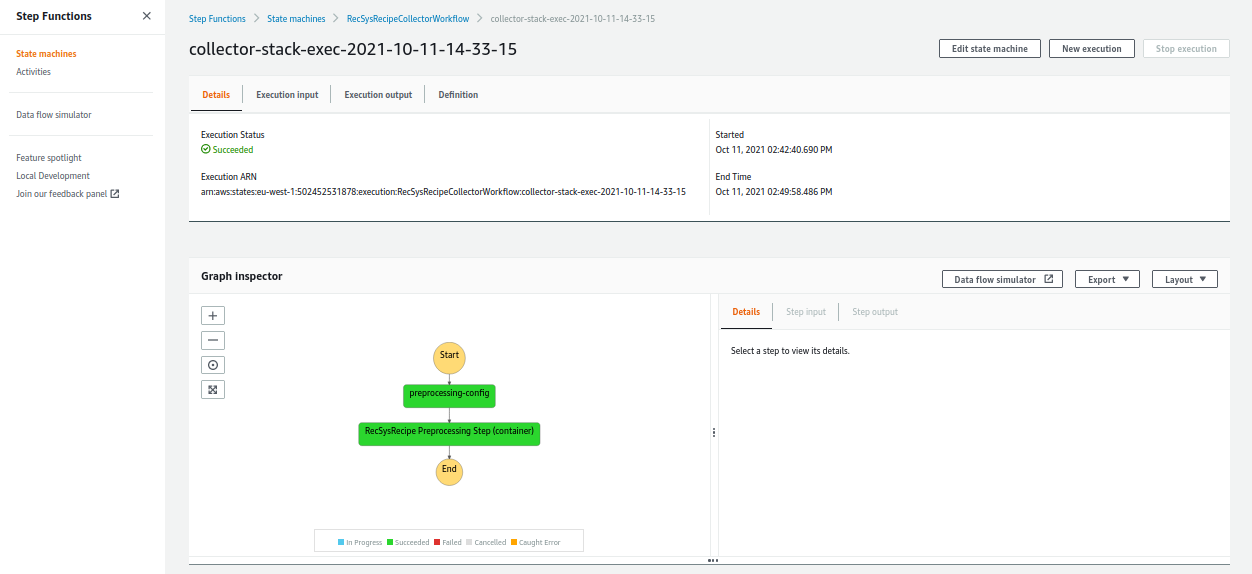
Your processed data is saved in the S3 bucket associated with the RecSys in the following path:
<bucket_name>
	|__ RecSys_Recipe_StepFunctions_CDK
		|__ processed_data
Step.15
After the collector stack, it is now time to deploy and execute the RecSys core stack. As it was discussed before, the core stack is responsible for model training, evaluation and batch transform inference steps. Please open the RecSys admin panel again, and from the “Serving Recipe” menu, head to the “Core Stack” section. Here, please specify a unique “Execution name” and click on the “Deploy Configurations” button.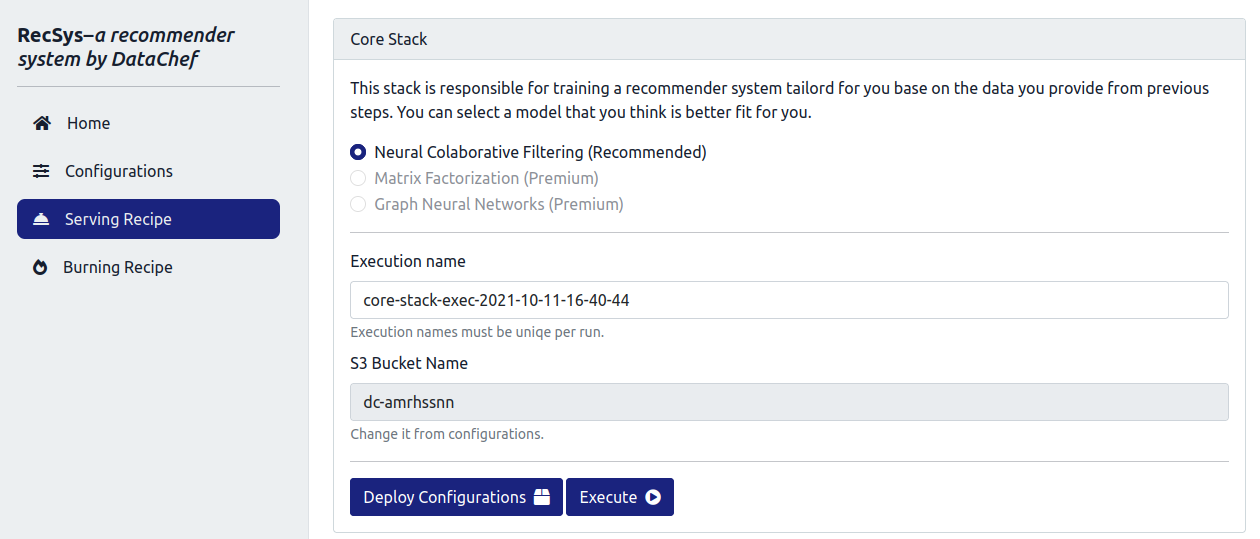
This will take almost 5 minutes to deploy the specified configurations. After that, please go ahead and click on the “Execute” button. Now, you can go to the AWS StepFunctions console and see the “RecSysRecipeCoreWorkflow”.
You can click on “RecSysRecipeCoreWorkflow” to see the status of the workflow.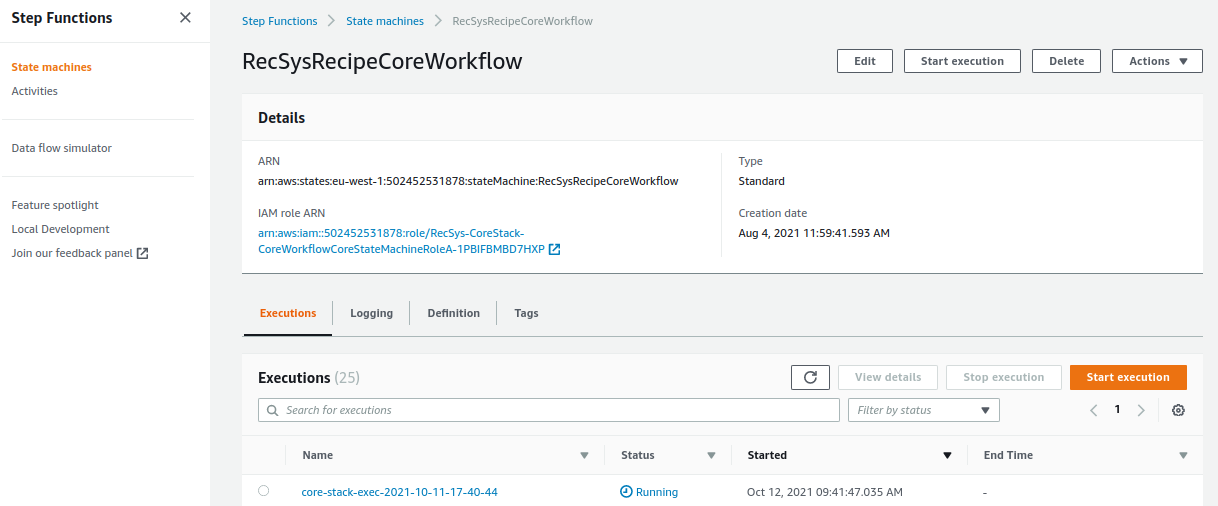
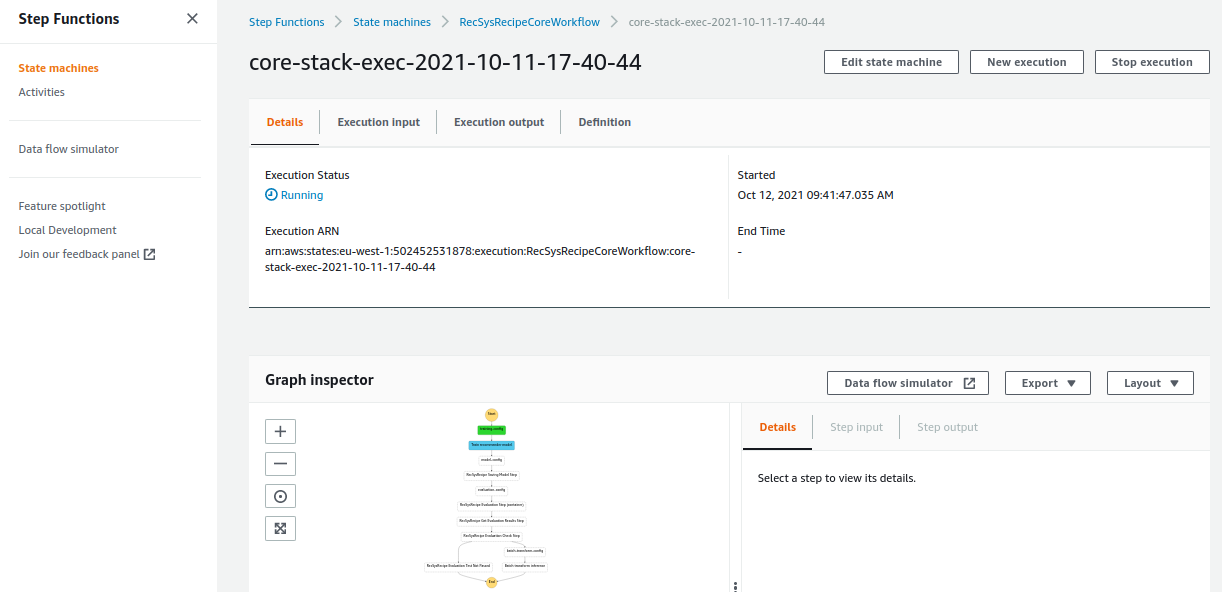
The core stack has multiple steps including training, evaluation, and batch-transform steps. Once all of these steps are finished, the color of these steps indicating their status turns green.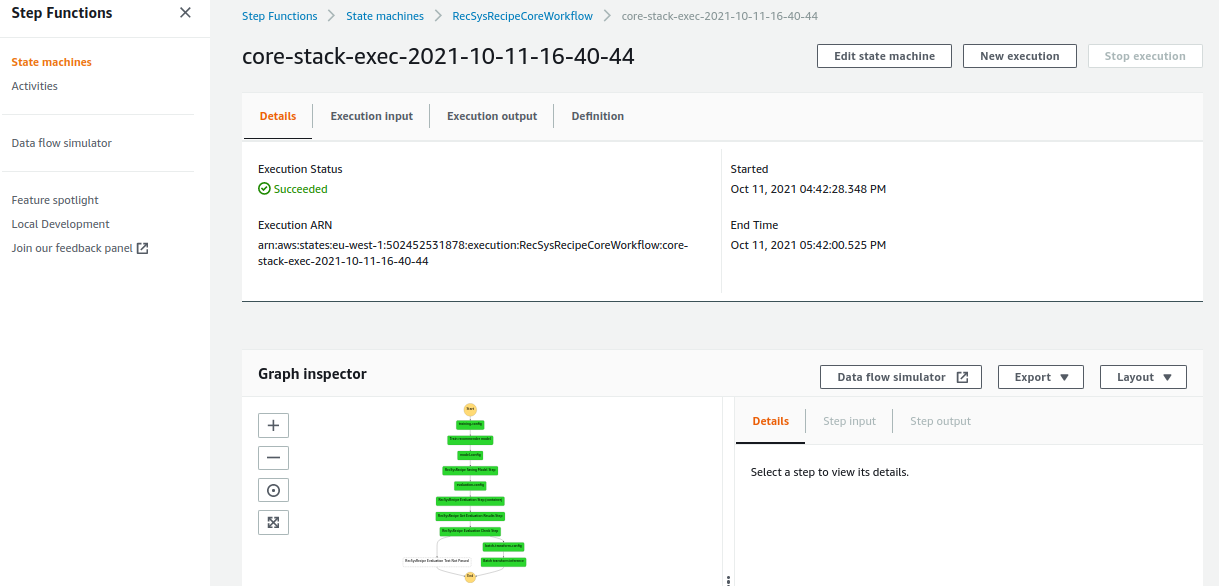
The artifacts produced by the core stack can be found in the S3 bucket associated with RecSys in the following paths:
<bucket_name>
	|__ RecSys_Recipe_StepFunctions_CDK
		|__ model
		|__ evaluation
		|__ batch_transform_inference_output
The “model”, “evaluation”, and “batch_transform_inference_output” directories contain the trained model parameters, evaluation results on test data, and the recommendations produced by the model, respectively.
Step.16
Now that you have executed the collector and core stacks, everything is ready to use the RecSys in your production environment. There are two ways to use the produced recommendations; either using batch recommendations or using the live API. If you wish to use the batch recommendations, you can access the produced artifacts in the S3 bucket. In order to use the live API, please open the RecSys admin panel again. Choose the “Serving Recipe” from the left menu. Now, scroll down to the “Responder Stack” section and click on the “Deploy Configurations” button.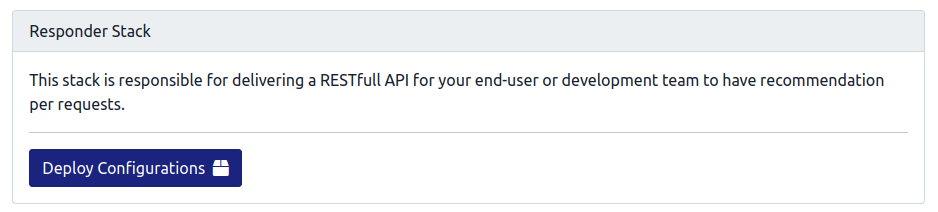
Now, you can open the AWS CloudFormation console and check the status of the responder stack.
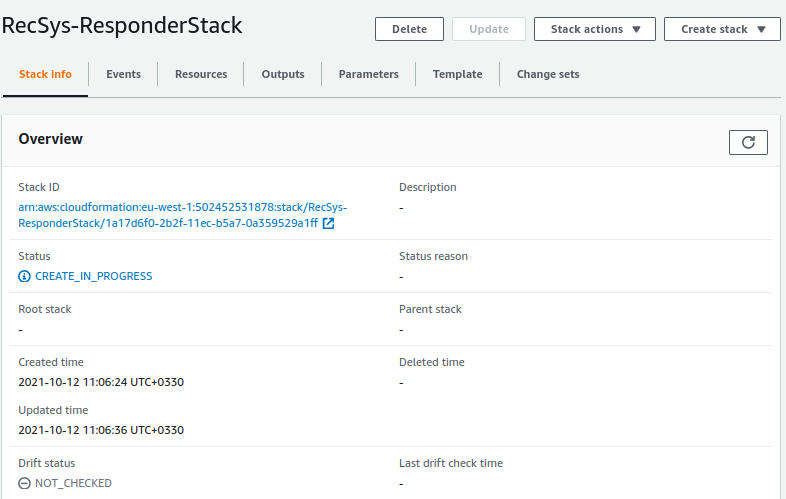
As you can see, the status is “CREATE_IN_PROGRESS”. This status takes several minutes.
Once the status is “CREATE_COMPLETE”, the application server that serves the recommendation APIs is deployed.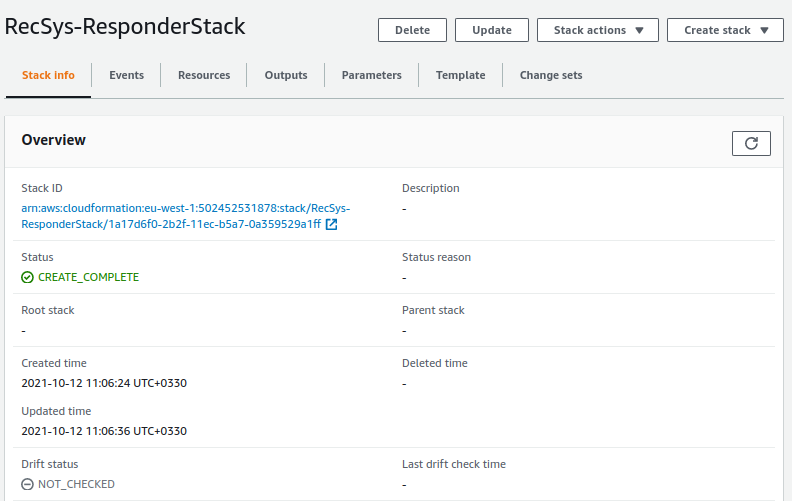
Now open the AWS API Gateway console. Here you can see the “RecSys-REST-APIs” in the APIs list.
please go ahead and click on the “RecSys-REST-APIs”.
Step.17
On the side menu, choose the “Stages” section. As you can see, you now have the prod stage available.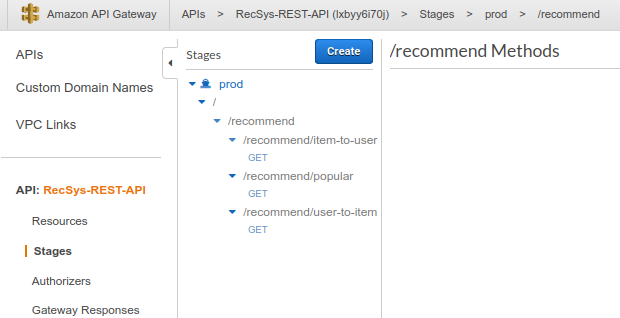
There are three APIs for the recommender system, namely
/recommend/item-to-user
/recommend/user-to-item
/recommend/popular
These three methods receive HTTP GET requests and return the results.
/recommend/item-to-user
You can get the invoke URL by clicking on the “GET” under the “/recommend/item-to-user”.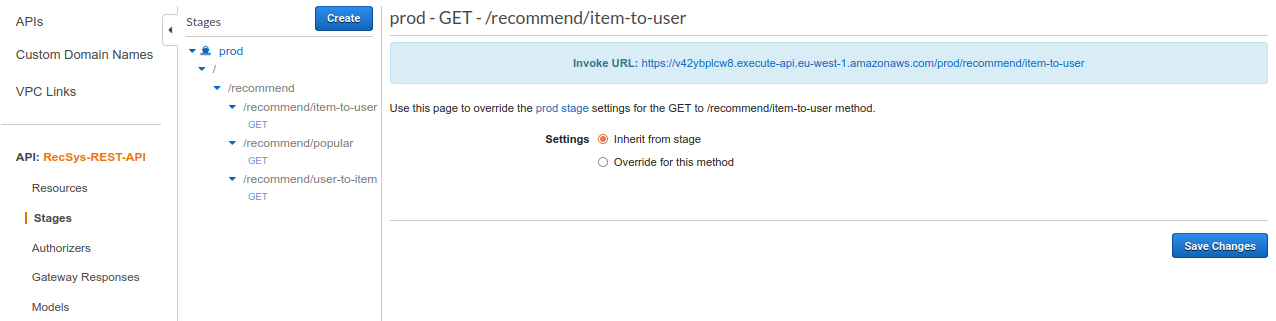
By sending GET requests to this URL, you can get recommendations for specific users. This API requires several query parameters:
- type: This parameter has to be set to “items2users”.
- id_list: The list of user IDs to whom you want to recommend items.
- k: Number of recommendations per each user ID
- novel_only: This parameter should be set to 1 if you only want to recommend new items, i.e., items that users have never had interacted with. Otherwise, set it to 0.
- return_attributes: This parameter should be set to 1 if you want to get the item attributes along with the recommendation results. Otherwise, set it to 0.
Here is an example of such an API call with its corresponding response. This request translates into “send 10 item recommendations for each of the users with IDs 10 and 20. These recommendations should be novel and return the attributes of the recommended items.”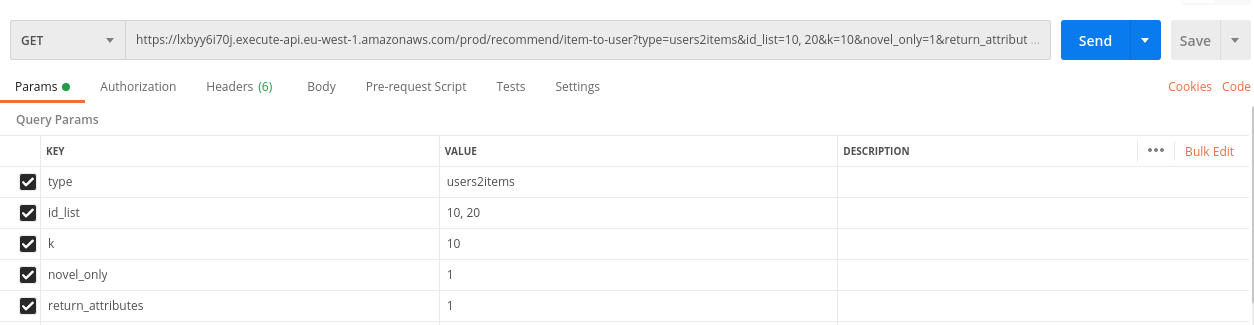
{"10": [{"item_id": 2289, "interaction_probability": 0.7597739696502686, "age": 29, "name": "Player, The", "genre": ["Comedy", "Drama"]}, {"item_id": 2916, "interaction_probability": 0.7516942620277405, "age": 31, "name": "Total Recall", "genre": ["Action", "Adventure", "Sci-Fi", "Thriller"]}, {"item_id": 296, "interaction_probability": 0.7243351936340332, "age": 27, "name": "Pulp Fiction", "genre": ["Crime", "Drama"]}, {"item_id": 1094, "interaction_probability": 0.7186055183410645, "age": 29, "name": "Crying Game, The", "genre": ["Drama", "Romance", "War"]}, {"item_id": 3793, "interaction_probability": 0.7170565128326416, "age": 21, "name": "X-Men", "genre": ["Action", "Sci-Fi"]}, {"item_id": 2987, "interaction_probability": 0.714729368686676, "age": 33, "name": "Who Framed Roger Rabbit?", "genre": ["Adventure", "Animation", "Film-Noir"]}, {"item_id": 2699, "interaction_probability": 0.7092217803001404, "age": 31, "name": "Arachnophobia", "genre": ["Action", "Comedy", "Sci-Fi", "Thriller"]}, {"item_id": 2365, "interaction_probability": 0.7055225968360901, "age": 59, "name": "King Kong vs. Godzilla", "genre": ["Action", "Sci-Fi"]}, {"item_id": 2194, "interaction_probability": 0.7036930322647095, "age": 34, "name": "Untouchables, The", "genre": ["Action", "Crime", "Drama"]}, {"item_id": 1968, "interaction_probability": 0.6965365409851074, "age": 36, "name": "Breakfast Club, The", "genre": ["Comedy", "Drama"]}], "20": [{"item_id": 260, "interaction_probability": 0.760924220085144, "age": 44, "name": "Star Wars: Episode IV - A New Hope", "genre": ["Action", "Adventure", "Fantasy", "Sci-Fi"]}, {"item_id": 2289, "interaction_probability": 0.7603326439857483, "age": 29, "name": "Player, The", "genre": ["Comedy", "Drama"]}, {"item_id": 1210, "interaction_probability": 0.7579514384269714, "age": 38, "name": "Star Wars: Episode VI - Return of the Jedi", "genre": ["Action", "Adventure", "Romance", "Sci-Fi", "War"]}, {"item_id": 2916, "interaction_probability": 0.7522812485694885, "age": 31, "name": "Total Recall", "genre": ["Action", "Adventure", "Sci-Fi", "Thriller"]}, {"item_id": 1196, "interaction_probability": 0.7432640790939331, "age": 41, "name": "Star Wars: Episode V - The Empire Strikes Back", "genre": ["Action", "Adventure", "Drama", "Sci-Fi", "War"]}, {"item_id": 1676, "interaction_probability": 0.732684314250946, "age": 24, "name": "Starship Troopers", "genre": ["Action", "Adventure", "Sci-Fi", "War"]}, {"item_id": 32, "interaction_probability": 0.727466344833374, "age": 26, "name": "Twelve Monkeys", "genre": ["Drama", "Sci-Fi"]}, {"item_id": 296, "interaction_probability": 0.7249011397361755, "age": 27, "name": "Pulp Fiction", "genre": ["Crime", "Drama"]}, {"item_id": 480, "interaction_probability": 0.7239136099815369, "age": 28, "name": "Jurassic Park", "genre": ["Action", "Adventure", "Sci-Fi"]}, {"item_id": 1097, "interaction_probability": 0.7227147221565247, "age": 39, "name": "E.T. the Extra-Terrestrial", "genre": ["Children's", "Drama", "Fantasy", "Sci-Fi"]}]}
/recommend/user-to-item
You can get the invoke URL by clicking on the “GET” under the “/recommend/user-to-item”.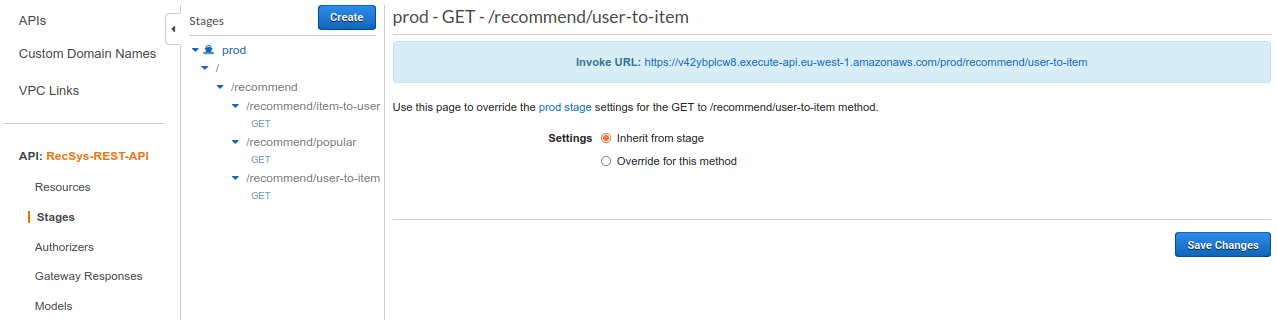
By sending GET requests to this URL, you can get recommendations for specific items. This API requires several query parameters:
- type: This parameter has to be set to “users2items”.
- id_list: The list of item IDs to which you want to recommend users.
- k: Number of recommendations per each item ID
- novel_only: This parameter should be set to 1 if you only want to recommend new users, i.e., users that have never had interacted with the item. Otherwise, set it to 0.
- return_attributes: This parameter should be set to 1 if you want to get user attributes along with the recommendation results. Otherwise, set it to 0.
Here is an example of such an API call with its corresponding response. This request translates into “send 10 user recommendations for each of the items with IDs 10 and 11. These recommendations should be novel.”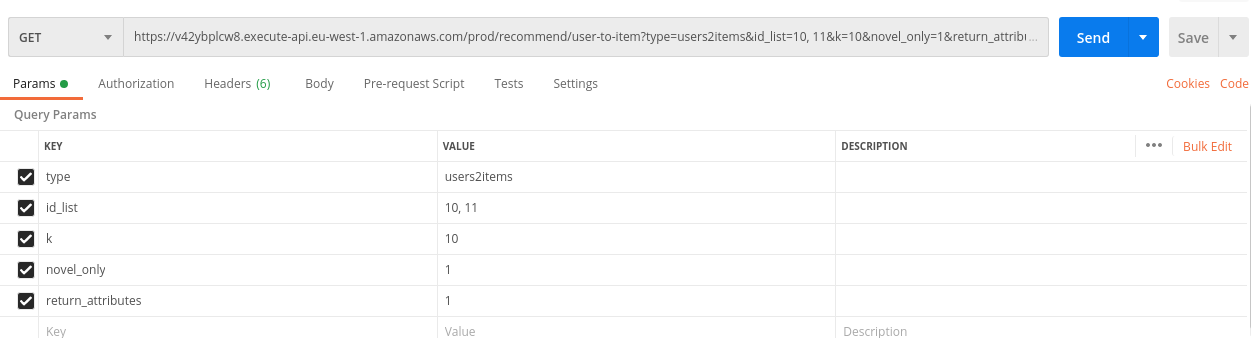
{"10": [{"user_id": 3960, "interaction_probability": 0.5598129630088806}, {"user_id": 4395, "interaction_probability": 0.5522818565368652}, {"user_id": 860, "interaction_probability": 0.5498666167259216}, {"user_id": 906, "interaction_probability": 0.5422000288963318}, {"user_id": 3071, "interaction_probability": 0.5416236519813538}, {"user_id": 2822, "interaction_probability": 0.5410628318786621}, {"user_id": 892, "interaction_probability": 0.5385136604309082}, {"user_id": 1412, "interaction_probability": 0.5353610515594482}, {"user_id": 2298, "interaction_probability": 0.5331212878227234}, {"user_id": 4066, "interaction_probability": 0.5324651598930359}], "11": [{"user_id": 3960, "interaction_probability": 0.5411821007728577}, {"user_id": 4395, "interaction_probability": 0.5336178541183472}, {"user_id": 860, "interaction_probability": 0.5313919186592102}, {"user_id": 906, "interaction_probability": 0.5234586596488953}, {"user_id": 3071, "interaction_probability": 0.522905707359314}, {"user_id": 2822, "interaction_probability": 0.5223140120506287}, {"user_id": 1968, "interaction_probability": 0.521863579750061}, {"user_id": 892, "interaction_probability": 0.519781768321991}, {"user_id": 4079, "interaction_probability": 0.5171127319335938}, {"user_id": 1412, "interaction_probability": 0.516614556312561}]}
/recommend/popular
You can get the invoke URL by clicking on the “GET” under the “/recommend/popular”.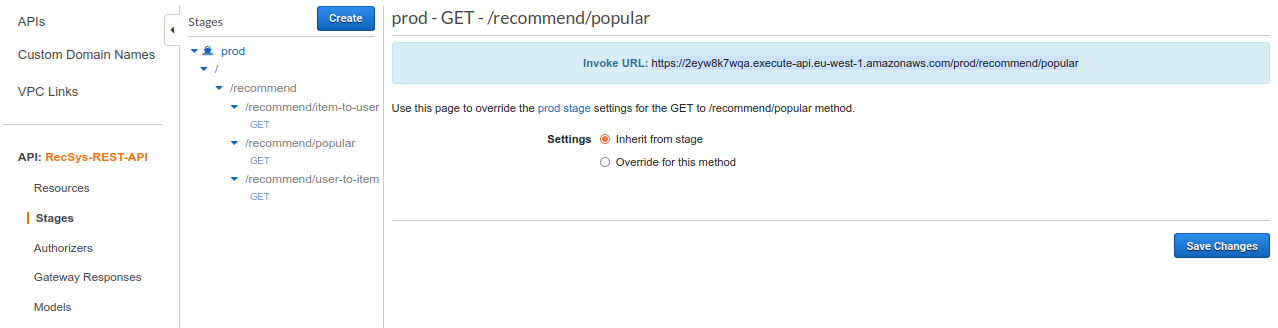
By sending GET requests to this URL, you can get recommendations for specific users. This API is used to return popular items, and it is useful for handling cold start cases. It requires several query parameters:
- type: This parameter has to be set to “popular_items”.
- id_list: The list of user IDs to whom you want to recommend popular items.
- k: Number of recommendations per each user ID
- novel_only: This parameter should be set to 1 if you only want to recommend new items, i.e., items that the user has never had interacted with. Otherwise, set it to 0.
- return_attributes: This parameter should be set to 1 if you want to get user attributes along with the recommendation results. Otherwise, set it to 0.
Here is an example of such an API call with its corresponding response. This request translates into “send 3 most popular item recommendations for each of the users with IDs 10 and 20. These recommendations should be novel and return the attributes of the recommended items.”
{"10": [{"item_id": 3147, "count": 1222, "age": 22, "name": "Green Mile, The", "genre": ["Drama", "Thriller"]}, {"item_id": 1090, "count": 1143, "age": 35, "name": "Platoon", "genre": ["Drama", "War"]}, {"item_id": 1370, "count": 1135, "age": 31, "name": "Die Hard 2", "genre": ["Action", "Thriller"]}], "20": [{"item_id": 1704, "count": 1548, "age": 24, "name": "Good Will Hunting", "genre": ["Drama"]}, {"item_id": 3471, "count": 1451, "age": 44, "name": "Close Encounters of the Third Kind", "genre": ["Drama", "Sci-Fi"]}, {"item_id": 2959, "count": 1451, "age": 22, "name": "Fight Club", "genre": ["Drama"]}]}
Step.18
Thus far, we have discussed how to set up and use the system.
RecSys admin panel provides an easy way to delete all the stacks whenever you want.
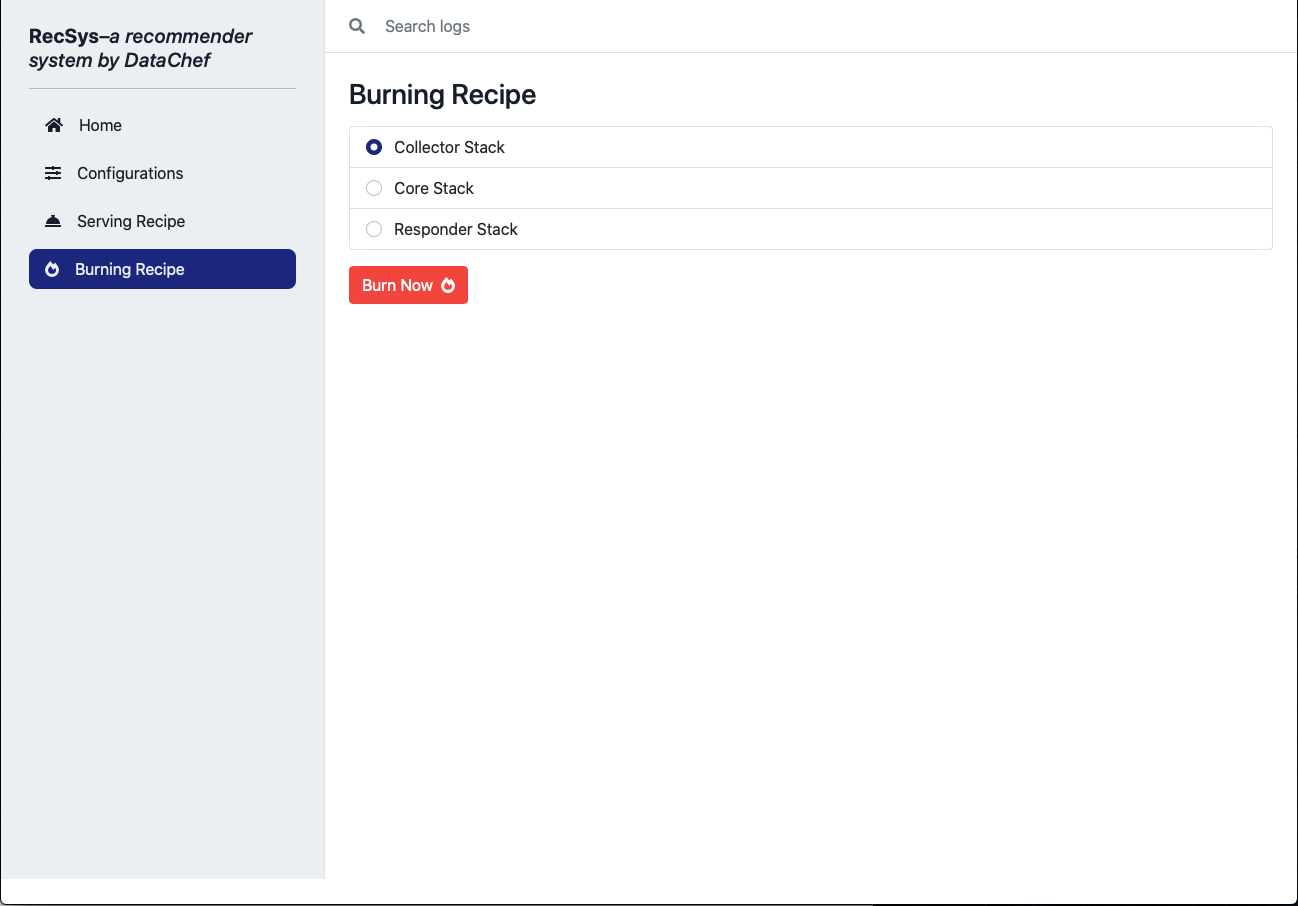
In order to do that, please open the RecSys admin panel again, and from the side menu, select the “Burning Recipe” section.
Here, as you can see, you can select each of the collector, core, and responder stacks and click on the “Burn Now” button.
This will remove the corresponding CloudFormation stack and all of its resources.

If you have any further questions or concerns, please contact us at [email protected].